For more information, see the Adobe Photoshop Version 3.0 User Guide located in the Laboratory for Scientific Visualization.
Image Resolution
Image resolution refers to the spacing of pixels within the image and is measured in pixels per inch (ppi). The higher the resolution, the more pixels in the image. Higher resolutions allow for more detail and subtle color transitions in an image.
Resolution and Image Size
Image size describes the physical dimensions of an image. Because the number of pixels in an image is fixed, increasing the size of an image decreases its resolution, and decreasing its size increases its resolution. For example, doubling the resolution of an image from 72 to 144 ppi reduces it to one quarter of its original size. Halving the resolution, for example, from 300 to 150 creates an image that is twice its original dimensions.
If you keep the image the same size, increasing the resolution requires Adobe Photoshop to create new pixels that can make the image appear blurry or out of focus. Because of this, increasing the resolution often produces a poorer quality image than the original.
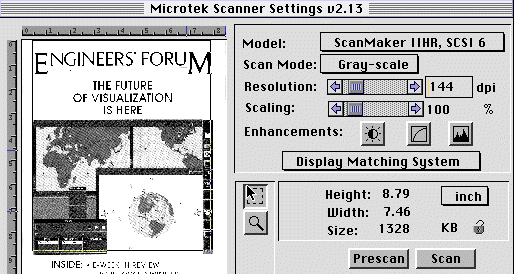
Before you open Adobe Photoshop you should make sure the scanner is on and ready to scan. Once the scanner is ready (usually is indicated by a green ready light) you may open Adobe Photoshop by choosing the Adobe Photoshop command by clicking on the "Apple" button and dragging down to the Applications selection. Once Adobe Photoshop has loaded you may either edit an already existing image or you may scan in a new image. To edit an existing image, choose File > Open and open your image from the appropriate disk/directories. To scan in a new image go to the File > Acquire submenu and choose the appropriate plug-in module for the scanner you will be using. In our case, we chose the Scanmaker Plug-in 2.13 option. The following window will appear prompting you for scan mode, resolution, and other information:
We recommend scanning images at a resolution of 144 pixels per inch. If your image is in color or is unusually large, you may wish to select a lower resolution to keep the file size reasonable. Remember: it is usually better to scan the image in at a higher resolution than what the final image resolution will be (see Resolution Basics).
It will usually take anywhere from one to five minutes for the scanner to scan the image. The length of scan time depends on hardware, as well as color and resolution settings. When the scanner has successfully scanned the image, a window will appear in Adobe Photoshop with the newly scanned image in it. Adobe Photoshop can now be used to edit and the save the image.
Once a new image has been scanned or a previously saved image has been opened, Adobe Photoshop may be used to edit the image.
The tools in the toolbox allow you to select, paint, edit, and view images.
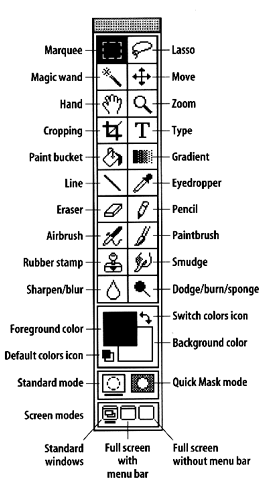
Listed below are descriptions of the tools in the toolbox.
The tools
The marquee tool is used to make rectangular and elliptical selections within the image.
The lasso tool is essentially the same as the marquee toll, except that the lasso tool enables the user to define the selection freehand. This tool is especially helpful in isolating irregularly-shaped objects surrounded by other objects.
The magic wand tool makes selections based on the color similarities of adjacent pixels. This tool is useful in selecting part of an image without tracing the outline with the lasso tool.
The move tool is used to move selections by dragging the mouse.
The hand tool is used to scroll through an image that does not fit in the active window.
The zoom tool is used to magnify an image (not to change its size). This tool can also be used in conjunction with the Option key on the keyboard to zoom out.
The cropping tool discards the remainder of the image outside of the region selected by the tool.
The paint bucket tool fills in areas that are adjacent to the point you click with the current foreground color.
The gradient fill tool creates a gradual transition from the foreground to the background color.
The line tool paints straight line segments. Properties of the lines, including width and arrowheads, can be changed by double-clicking on the line tool in the toolbox.
The eyedropper tool is used to sample and match colors in an image.
The eraser tool erases pixels and changes them to the same color as the background color (usually white).
The pencil tool can be used to color individual pixels.
The airbrush tool is used to apply a diffused spray of the foreground color on the image.
The paintbrush tool paints soft-edged strokes of the foreground color.
The rubber stamp tool samples a part of an image and can place an exact copy of that sample elsewhere.
The smudge tool simulates the effect of dragging a finger through wet paint.
The blur/sharpen tools blur or sharpen parts of an image.
The dodge/burn/sponge tools can lighten, darken, or change the saturation of part of an image.
These are tools we found particularly helpful:
The Rotate command allowed us to align the images horizontally. The Rotate command can also rotate selections, such as text, for aligning with vertical axes.
Blurring was usually the last operation we performed on an image. Like anti-aliasing in text, blurring helps smooth out rough edges created a more aesthetically pleasing image.
Once the image appeared the way we wanted it, we would go the Image>Image Size selection. The following window appears:
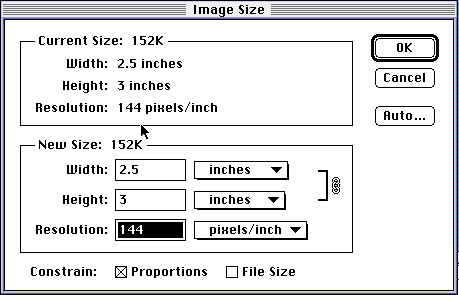
In general, the final width of the images in our project was about three inches, in order to fit on a typical Netscape window. We could also limit the resolution as well, if file size was a problem.
Adobe Photoshop can read and save images in many formats. These include Photoshop 3.0, Photoshop 2.0, Amiga IFF, BMP, CompuServe GIF, Filmstrip, JPEG, MacPaint, PCX, PICT file, Targa, and TIFF (among others). The images in our project were either GIFs or JPEGs, since these are by far the two most popular formats online. GIFs tended to be slightly more reliable on some machines, although this never really posed a serious problem.